Face analysis based on deep learning
Deep learning 기술이 발전하면서 Face analysis 성능도 향상 되었습니다.
성능이 좋은 Open source기반 Face analysis library를 소개하고 사용법을 설명하겠습니다.
InsightFace: 2D and 3D Face Analysis Project
https://github.com/deepinsight/insightface
※ License : 위 사이트에서 참조하세요 !
이 곳에서 여러가지 Model을 공유하고 있으며, 그 중 buffalo_l 이라는 Model pack을 소개하고자 합니다.
buffalo_l은 blob box, key points, detection score, landmark 2d/3d, gender, age, embedding, pose 정보를 제공합니다.
Python을 활용하여 Face analysis 하는 과정을 보여드리겠습니다.
Python package install
다음 패키지를 설치하세요.
(이미 설치되어 있는 패키지는 설지 않아도 됩니다.)
- pip install numpy
- pip install opencv-python
- pip install pillow
- pip install insightface
- pip install onnxruntime
Model download
다음 Link를 통하여 model을 다운로드하세요.
- Download link :
buffalo_l download
Python 소스 코드가 위치한 경로에 다운로드된 파일을 압축 해제 하세요.
Tree 구조는 다음과 같아야 합니다.
├─ source_code.py
├─ checkpoints
└─ models
└─ buffalo_l
└─ 1k3d68.onnx
└─ 2d106det.onnx
└─ det_10g.onnx
└─ genderage.onnx
└─ w600k_r50.onnx
Python code
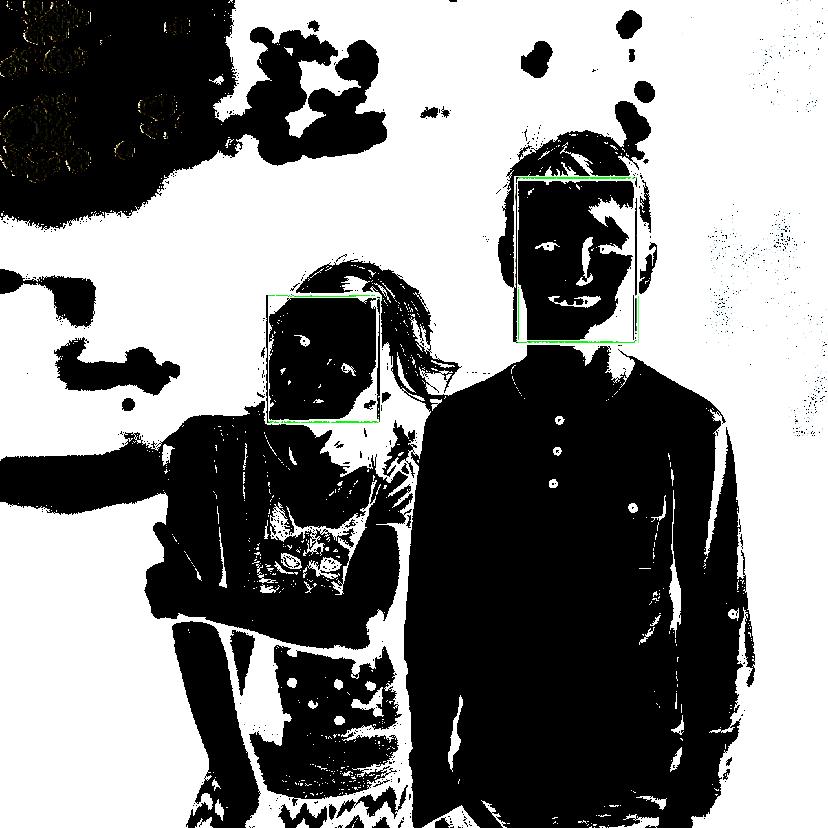
다음 코드는 얼굴을 찾아서 네모박스를 그립니다.
faces에 찾아낸 얼굴에 관한 정보가 담겨있습니다.
여러 명의 얼굴도 찾을 수 있으며, faces는 List이기 때문에 각 얼굴정보를 index로 접근할 수 있습니다.
import cv2
import insightface
import onnxruntime
import numpy as np
from PIL import Image

providers = onnxruntime.get_available_providers()
face_analyser = insightface.app.FaceAnalysis(name="buffalo_l", root="./checkpoints", providers=providers)

det_size=(320, 320)
face_analyser.prepare(ctx_id=0, det_size=det_size)

img = Image.open('face.jpg')
img = cv2.cvtColor(np.array(img), cv2.COLOR_RGB2BGR)

faces = face_analyser.get(img)
print(faces)

if len(faces) >= 1:
    for face in faces:
        x1 = round(face['bbox'][0])
        y1 = round(face['bbox'][1])
        x2 = round(face['bbox'][2])
        y2 = round(face['bbox'][3])

        color_bgr = (0, 255, 0)
        box_thickness = 3
        cv2.rectangle(img, (x1, y1), (x2, y2), color_bgr, box_thickness)

    cv2.imwrite('output.jpg', img)

else:
    print('Face not found.')
위 코드를 실행하여 다음과 같이 얼굴에 네모 박스를 그렸습니다.
위 코드에서 face가 가지는 분석 정보는 다음과 같이 9가지가 있습니다.
face['bbox']: Blob box (네모 박스 얼굴 위치)face['kps']: Key points (눈, 코, 입 위치)face['det_score']: Detection score (감지된 객체가 얼굴일 가능성을 나태는 점수)face['landmark_2d_106']: face landmark 3dface['landmark_3d_68']: face landmark 3d (눈, 눈썹, 코, 입, 얼굴 윤곽을 표현하는 점들)face['pose']: Pitch, Yaw, Roll (얼굴의 위/아래 기울어짐, 좌/우 회전, 좌/우 기울어짐)face['gender']: 성별face['age']: 나이face['embedding']: 얼굴 고유 벡터
bbox는 위에서 확인했으므로, 나머지 8개를 알아봅시다.
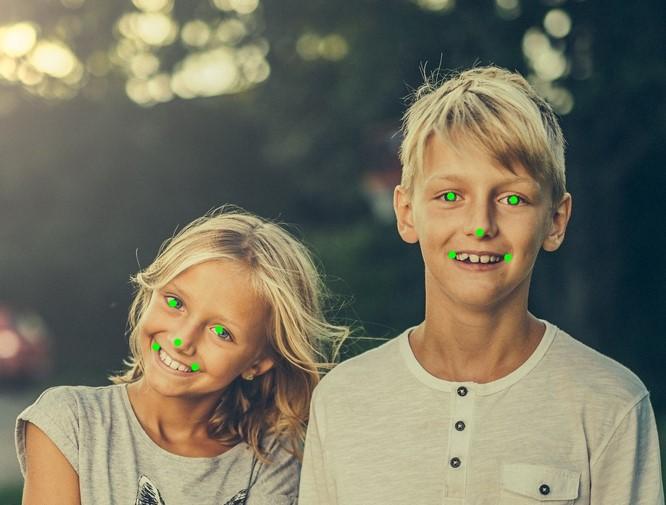
kps (Key points)
kps는 눈, 코, 입의 위치입니다.
kps의 좌표에 점을 찍으면 다음과 같이 표현됩니다.
det_score (Detection score)
det_score는 감지된 객체가 얼굴일 가능성을 나타내는 점수 입니다.
0~1의 실수값을 가지며 1에 가까울 수록 얼굴일 가능성이 크다는 의미 입니다.
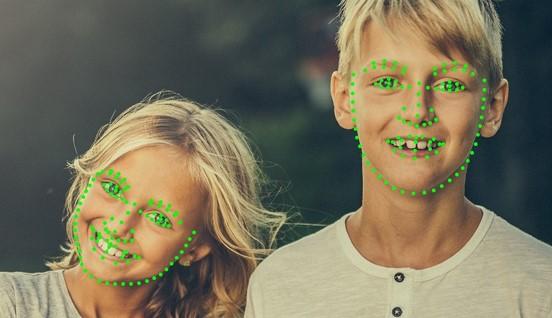
landmark_2d_106
2D 좌표계에서 눈, 눈썹, 코, 입, 얼굴 윤곽을 표현하는 점들입니다.
이 점들은 다음과 같이 표현됩니다.
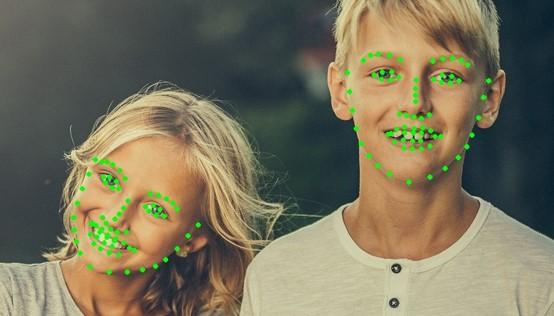
landmark_3d_68
3D 좌표계에서 눈, 눈썹, 코, 입, 얼굴 윤곽을 표현하는 점들입니다.
이 점들은 다음과 같이 표현됩니다.
pose
얼굴의 Pitch, Yaw, Roll 정보를 나타냅니다.
- Pitch : 얼굴의 위/아래 기울어짐 (양수:위, 음수:아래)
- Yaw : 얼굴의 좌/우 회전 (양수:좌, 음수:우)
- Roll : 얼굴의 좌/우 기울어짐 (양수:좌, 음수:우)
gender
예측된 성별입니다.
age
예측된 나이입니다.
embedding
얼굴 고유의 512차원 벡터입니다.
두 얼굴이 동일한 인물인지 판단하려면, 두 얼굴 embedding 벡터의 유사도를 계산하면 됩니다.
예를 들어, Cosine 유사도 계산하여 1에 가까울 수록 동일한 인물임을 의미합니다.